Laborboard/en: Unterschied zwischen den Versionen
(There is no fool like an old fool.) |
Thomas (Diskussion | Beiträge) (Wikispam revertet) |
||
| Zeile 9: | Zeile 9: | ||
The board's core is a ATmega32 controller. There are 4 buttons (Port B) and 8 LEDs (Port C) connected. Additionally there is a 16Mhz quartz oscillator, a reset button and a small circuit to stabilize the supply voltage. | The board's core is a ATmega32 controller. There are 4 buttons (Port B) and 8 LEDs (Port C) connected. Additionally there is a 16Mhz quartz oscillator, a reset button and a small circuit to stabilize the supply voltage. | ||
==Getting started== | |||
You can find a list of the needed [[LaborBoardTeile|parts]] in this wiki -- Find the component placement specification and circuit diagram here ''https://roulette.das-labor.org/svnview/microcontroller/doc/Layouts/'' . A lot of example code can be found in our [[Subversion]] at ''https://roulette.das-labor.org/svnview/microcontroller''. | |||
==Step by== | ==Step by== | ||
Version vom 4. Mai 2008, 17:02 Uhr
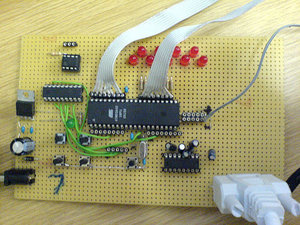
The Laborboard
The Laborboard is a small board you can gain experience in microcontrollers with.
What does it consist of?
The board's core is a ATmega32 controller. There are 4 buttons (Port B) and 8 LEDs (Port C) connected. Additionally there is a 16Mhz quartz oscillator, a reset button and a small circuit to stabilize the supply voltage.
Getting started
You can find a list of the needed parts in this wiki -- Find the component placement specification and circuit diagram here https://roulette.das-labor.org/svnview/microcontroller/doc/Layouts/ . A lot of example code can be found in our Subversion at https://roulette.das-labor.org/svnview/microcontroller.
Step by
- 06.06.2005, Do: Microcontroller Workshop
- 14.06.2005, Fr: Microcontroller Workshop Part II
- 15.06.2005, Sa: Microcontroller Bastel-Samstag
- 08.07.2005, Fr: Microcontroller Workshop Part III
- 06.08.2005, Di: Microcontroller Workshop Part V (Canbus & Co)
- 13.09.2005, Di: Microcontroller Workshop: Borgs
- 14.11.2006, Di: Microcontroller Workshop
- 16.11.2006, Do: Microcontroller Workshop
Projects building upon the Labor Micro Board
- Blinken Borgs/en
- Peter's Shortcut-Tastatur
- Labor automation projekt with the help of CAN Bus and LAP, the Labor Automation Protocol.
Setting fuses
For the controllers to work with the external quartz oscillator and to control the LEDs with all pins on Port C, you have to set the fuses correctly. ATTENTION: SETTING THE WRONG FUSES CAN BRICK YOUR CONTROLLER! The order is important, too: first set hfuse, then lfuse.
...you have been warned. ;)
avrdude -c bsd -p m32 -t
...some kind of console upens up ...
 write hfuse 0 0xc9
 write lfuse 0 0x9f
 quit
... you should see a confirmation message
If you lack avrdude, you can also use uisp:
 uisp -dprog=bsd --wr_fuse_h=0xc9
 uisp -dprog=bsd --wr_fuse_l=0x9f
pin assignment of the programming plug
       +-----+
   GND | 0 0 | MISO
   GND | 0 0 | SCK
   GND | 0 0   RESET (inv)
   GND | 0 0 | (not assigned)
   VCC | 0 0 | MOSI
       +-----+
Links
- AVR + gcc tutorial: http://www.mikrocontroller.net/articles/AVR-GCC-Tutorial
- avr-libc manual: http://www.nongnu.org/avr-libc/user-manual/index.html
- Toolchain install: http://www.nongnu.org/avr-libc/user-manual/install_tools.html (do not use old port/packages! avr-libc < 1.23 has bugs in malloc)
- ATmega32 Data Sheet: http://www.atmel.com/dyn/resources/prod_documents/doc2503.pdf
