Laborboard/en: Unterschied zwischen den Versionen
(Die Seite wurde neu angelegt: __NOTOC__ 300px|right ==The Laborboard== The Laborboard is a small board you can gain experience in microcontrollers with. ==What does it co...) |
Soeren (Diskussion | Beiträge) KKeine Bearbeitungszusammenfassung |
||
| (18 dazwischenliegende Versionen von 16 Benutzern werden nicht angezeigt) | |||
| Zeile 4: | Zeile 4: | ||
==The Laborboard== | ==The Laborboard== | ||
The Laborboard is a small board you | The Laborboard is a small board for those of you who want to start programming microcontrollers. | ||
==What does it consist of?== | ==What does it consist of?== | ||
The board's core is a ATmega32 controller. There are 4 buttons (Port B) and 8 LEDs (Port C) connected. Additionally there is a 16Mhz quartz oscillator, a reset button and a small circuit to stabilize the supply voltage | The board's core is a ATmega32 controller. There are 4 buttons (Port B) and 8 LEDs (Port C) connected. Additionally there is a 16Mhz quartz oscillator, a reset button and a small circuit to stabilize the supply voltage. | ||
==Getting started== | ==Getting started== | ||
You can find a list of the needed [[LaborBoardTeile|parts]] in this wiki -- Find the component placement specification and circuit diagram here ''https:// | You can find a list of the needed [[LaborBoardTeile|parts]] in this wiki -- Find the component placement specification and circuit diagram here ''https://www.das-labor.org/trac/browser/microcontroller/doc/Layouts'' . A lot of example code can be found in our [[Subversion]] at ''https://www.das-labor.org/trac/browser/microcontroller''. | ||
==Step by== | ==Step by== | ||
| Zeile 29: | Zeile 29: | ||
* [[Automatisierung des Labors|Labor automation projekt]] with the help of [[CAN]] Bus and [[LAP]], the Labor Automation Protocol. | * [[Automatisierung des Labors|Labor automation projekt]] with the help of [[CAN]] Bus and [[LAP]], the Labor Automation Protocol. | ||
==Setting fuses== | ==Setting fuses== | ||
For the controllers to work with the external quartz oscillator and to control the LEDs with all pins on Port C, you have to set the fuses correctly. '''ATTENTION: SETTING THE WRONG FUSES CAN BRICK YOUR | For the controllers to work with the external quartz oscillator and to control the LEDs with all pins on Port C, you have to set the fuses correctly. '''ATTENTION: SETTING THE WRONG FUSES CAN BRICK YOUR CONTROLLER!''' The order is important, too: first set hfuse, then lfuse. | ||
...you have been warned. ;) | ...you have been warned. ;) | ||
Aktuelle Version vom 23. Juni 2011, 10:33 Uhr
The Laborboard[Bearbeiten | Quelltext bearbeiten]
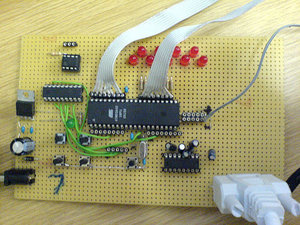
The Laborboard is a small board for those of you who want to start programming microcontrollers.
What does it consist of?[Bearbeiten | Quelltext bearbeiten]
The board's core is a ATmega32 controller. There are 4 buttons (Port B) and 8 LEDs (Port C) connected. Additionally there is a 16Mhz quartz oscillator, a reset button and a small circuit to stabilize the supply voltage.
Getting started[Bearbeiten | Quelltext bearbeiten]
You can find a list of the needed parts in this wiki -- Find the component placement specification and circuit diagram here https://www.das-labor.org/trac/browser/microcontroller/doc/Layouts . A lot of example code can be found in our Subversion at https://www.das-labor.org/trac/browser/microcontroller.
Step by[Bearbeiten | Quelltext bearbeiten]
- 06.06.2005, Do: Microcontroller Workshop
- 14.06.2005, Fr: Microcontroller Workshop Part II
- 15.06.2005, Sa: Microcontroller Bastel-Samstag
- 08.07.2005, Fr: Microcontroller Workshop Part III
- 06.08.2005, Di: Microcontroller Workshop Part V (Canbus & Co)
- 13.09.2005, Di: Microcontroller Workshop: Borgs
- 14.11.2006, Di: Microcontroller Workshop
- 16.11.2006, Do: Microcontroller Workshop
Projects building upon the Labor Micro Board[Bearbeiten | Quelltext bearbeiten]
- Blinken Borgs/en
- Peter's Shortcut-Tastatur
- Labor automation projekt with the help of CAN Bus and LAP, the Labor Automation Protocol.
Setting fuses[Bearbeiten | Quelltext bearbeiten]
For the controllers to work with the external quartz oscillator and to control the LEDs with all pins on Port C, you have to set the fuses correctly. ATTENTION: SETTING THE WRONG FUSES CAN BRICK YOUR CONTROLLER! The order is important, too: first set hfuse, then lfuse.
...you have been warned. ;)
avrdude -c bsd -p m32 -t
...some kind of console upens up ...
 write hfuse 0 0xc9
 write lfuse 0 0x9f
 quit
... you should see a confirmation message
If you lack avrdude, you can also use uisp:
 uisp -dprog=bsd --wr_fuse_h=0xc9
 uisp -dprog=bsd --wr_fuse_l=0x9f
pin assignment of the programming plug[Bearbeiten | Quelltext bearbeiten]
       +-----+
   GND | 0 0 | MISO
   GND | 0 0 | SCK
   GND | 0 0   RESET (inv)
   GND | 0 0 | (not assigned)
   VCC | 0 0 | MOSI
       +-----+
Links[Bearbeiten | Quelltext bearbeiten]
- AVR + gcc tutorial: http://www.mikrocontroller.net/articles/AVR-GCC-Tutorial
- avr-libc manual: http://www.nongnu.org/avr-libc/user-manual/index.html
- Toolchain install: http://www.nongnu.org/avr-libc/user-manual/install_tools.html (do not use old port/packages! avr-libc < 1.23 has bugs in malloc)
- ATmega32 Data Sheet: http://www.atmel.com/dyn/resources/prod_documents/doc2503.pdf
