VP5500: Unterschied zwischen den Versionen
| Zeile 111: | Zeile 111: | ||
} | } | ||
The default configuration restricts WPA Supplicant to operate only in WPA1 mode. WPA2 can be enabled by changing the configuration | The default configuration restricts WPA Supplicant to operate only in WPA1 mode. WPA2 can be enabled by changing the configuration as follows. The graphical configuration interface will - despite these changes - not be able to "register" to a network, because that tool will again add the commented-out lines to your config. | ||
network={ | network={ | ||
| Zeile 119: | Zeile 119: | ||
#key_mgmt=WPA-PSK | #key_mgmt=WPA-PSK | ||
#pairwise=TKIP | #pairwise=TKIP | ||
group=TKIP | #group=TKIP | ||
psk="your_passphrase" | psk="your_passphrase" | ||
} | } | ||
Version vom 24. März 2010, 01:43 Uhr
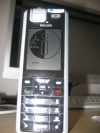
The Philips VP5500 is a WLAN VOIP- & Video Phone sold by KPN in the netherlands. Some of the features, such as configuration settings for the VOIP connection are usually hidden from the user, but can be revealed through a fake firmware image (description here). Thanks to this restriction the device was rendered useless when KPN decided to disconnect the VOIP services this phone was relieing on.
This article intends to collect all relevant information about the hard- & software on the telephone and to provide information to actually reuse the hardware.
Hardware
- CPU: MC9328MX21 @ 266MHz (ARM9 Core)
- FS455LF: PAL Video converter chip
- Wlan: Marvell 88w8385 (OSS driver, Datasheet)
- RAM: 64MB (2x K4S56163LF)
- Flash: 16MB
- Kamera: Chicony dc-4626.a5
- Audio Codec: TI TLV 320 AIC 12K
GPIO Interfaces
The script /usr/local/tmp/HD1_ats.sh is a test script for the developers. This script contains a lot of information about how to control peripheral devices of the phone (such as backlight).
Pinning
Serial
VCC: 3.3V, Rate 115200 Baud
Setting the "TIN" Pin to low or pressing keys while the bootloader is waiting will redirect first Console to the serial device. Fortunately the bootloader allows editing the kernel command line, so you're able to directly "chroot" the device by setting a different initrc (sh). Type the following at the bootloader prompt:
boot root=/dev/mtdblock2 init=/bin/sh
- Boot Log of the standard installation
- How to add a serial interface to your device
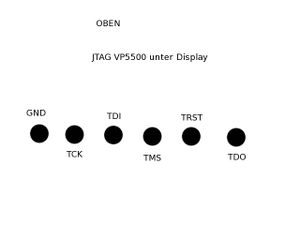
JTAG
Pins are at the back of the circuit board.
Partitions
0x00000000-0x00014000 : "bootloader"    blob version 2.0.5-pre2
0x00014000-0x00100000 : "kernel"        /boot (?)
0x00100000-0x01ce0000 : "fs #1"         /
0x01ce0000-0x01fe0000 : "fs #2"         /user_data
0x01fe0000-0x02000000 : "fs #3"         /user_settings
Drivers & Software
Audio
- Looks as if the audio codec in use needs a proprietary driver
MPEG en/decoder
- Hantrop MPEG EN- DECODER, kernel module: hmp4e
Camera
- Patch for 2.4.X - CMOS Sensor connected via I²C
Wlan
Framebuffer
Although the display is 176x220, the framebuffer has a virtual size of 240x220 pixels.
Creating an own splash image
- Create an image with 240x220 pixels in size
- Note: The on-screen visible area of this image is in the upper left corner with a size of 176x220 (actual display size). Furthermore the image is flipped upside down.
- Save it as RGB565 Bitmap (=5b for R, 6b for G, 5b for B) (gimp can do this for you)
- Strip off the BMP header:
tail -c 105600 your_bitmap.bmp > your_splasimage.bin
- Copy your shiny new splash image to /user_data/data/welcome.rgb565
2nd Splash image
The 2nd image is an animated GIF file and can be found in /usr/local/pics/qpe/splash.gif
Software
Bootloader (Blob)
Root FS & Toolchain
According to the boot log, the root fs is derived from some sample source code for the iMX21 development platform.
Kernel
Version: 2.4.20
Misc
To run the applications in /usr/local/bin, run export QTDIR=/usr/local first.
Boot process
Scripts & programs run at boot time:
- /etc/rc.d/rcS
- /etc/rc.d/init.d/*
- /usr/local/startup/daemon.sh (invoked by inittab)
- qpe
- upgraded
- netsyncd
Networking stuff
WPA Settings can be configured by editing the file /etc/marvell/wpa_supplicant.conf (vi is installed).
Example:
network={
 ssid="your_ssid"
 scan_ssid=1
 proto=WPA
 key_mgmt=WPA-PSK
 pairwise=TKIP
 group=TKIP
 psk="your_passphrase"
}
The default configuration restricts WPA Supplicant to operate only in WPA1 mode. WPA2 can be enabled by changing the configuration as follows. The graphical configuration interface will - despite these changes - not be able to "register" to a network, because that tool will again add the commented-out lines to your config.
network={
 ssid="your_ssid"
 scan_ssid=1
 #proto=WPA
 #key_mgmt=WPA-PSK
 #pairwise=TKIP
 #group=TKIP
 psk="your_passphrase"
}
This change will also persist when selecting another access point through the menu.
Configuration
For Sipgate:
SIP1 Display Name: your Name
User Name: your SIP-ID
Telephone Number: Tel.Nr.
Auth
Authentification UserName: your SIP-ID
Password: Sipgate Password
Server
SIP register address:port: sipgate.de:5060
Proxy
SIP proxy1 address:port: sipgate.de:5060
SIP2
SIP Port Listen
for UDP: 5062
for TCP: 5062
for TCP TLS: 5053
SIP Outbound needs to be empty.
Making Backups
If you want to make a backup of your root partition, you can do as follows:
echo '#!/bin/sh' > /tmp/backup.sh
echo 'cat /dev/mtdb2' >> /tmp/backup.sh
chmod 700 /tmp/backup.sh
micro_inetd 31337 /tmp/backup.sh
This'll make your device listen for incoming connections on port 31337. On your host system you may then simply run "nc ip.of.your.phone 31337 > /path/to/backup/file" - et voilà, you got your rootfs packed into a file. Note that the backed up file is not ext2, but a jffs2 formatted filesystem. These can't be handled by a simple "mount -o loop" as you'd have thought... so here's how you mount it:
modprobe jffs2
modprobe mtdram total_size=32768 erase_size=128
modprobe mtdblock
mkdir /tmp/phone-root
mknod /tmp/phone-mtdb2 b 31 0
dd if=/your/backup/file of=/tmp/phone-mtdb2
mount -t jffs2 /tmp/phone-mtdb2 /tmp/phone-root
This was easy, wasn't it? ;)
Links
- Thread where the actual reverse engineering happens
- Results will be demonstrated on the workshop root your toaster (2010/05/01)
- Hack to reveal the Config interface
- some more information
- Binary packages for the VP6500 (most of it should be compatible)


