Nakkaloader/en: Unterschied zwischen den Versionen
Soeren (Diskussion | Beiträge) K (Die Seite wurde neu angelegt: „{{ProjektInfoBox |name = Nakkaloader |status = beta |image = Nakkaloader.png |description = Funk Bootloader für AVRs mit RFM12 |author = […“) |
Sauron (Diskussion | Beiträge) Keine Bearbeitungszusammenfassung |
||
| Zeile 58: | Zeile 58: | ||
[[Kategorie:Microcontroller]] | [[Kategorie:Microcontroller]] | ||
[[Kategorie:Datenfunk mit dem Microcontroller]] | [[Kategorie:Datenfunk mit dem Microcontroller]] | ||
Aktuelle Version vom 14. Juni 2011, 07:36 Uhr
| Nakkaloader Release status: beta [box doku] | |
|---|---|

| |
| Description | Funk Bootloader für AVRs mit RFM12 |
| Author(s) | Soeren, Hansinator |
| Last Version | 0.1 () |
| Platform | AVR Microcontrollers |
| License | GPL |
| Download | http://www.das-labor.org/trac/browser/microcontroller/src-atmel/rfm12/nakkaloader/ |
The Nakkaloader is a bootloader for AVR Microcontrollers. When installed on the target device, it allows you to flash your AVR with a RFM12 radio transceiver module.
The project consists of two parts: Host and microcontroller firmware (the bootloader). The host software is designed to be used with a Rfm12usb device.
Installation[Bearbeiten | Quelltext bearbeiten]
Bootloader Firmware[Bearbeiten | Quelltext bearbeiten]
- Get the latest copy of the nakkaloader from our svn (see link on the left)
- cd into the firmware directory and edit the Makefile to suit your needs (set appropriate parameters for your MCU, programmer device & frequency)
- edit rfm12_config.h, set the appropriate pins for your hardware device
- run "make all install fuse"
- eventually set an address for the device (see instructions below)
Host software[Bearbeiten | Quelltext bearbeiten]
- cd into the directory "host/flasher"
- type "make" to compile
- run "nakkaloader firmware_file.bin address" (example: "nakkaloader main.bin 0xA3")
Protocol[Bearbeiten | Quelltext bearbeiten]
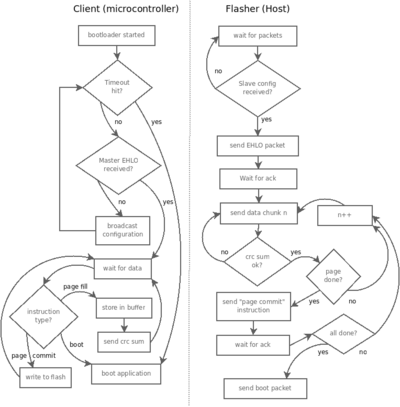
The protocol is shown on the left. It is relatively simple in order to keep it small in terms of code size. When the microcontroller is powered up or reset, it sends out its configuration. If it doesn't receive an answer within a given time, it starts the application code as normal.
In case the device receives a reply, it accepts the following instructions from the master:
PAGE_FILL :: Fill the page buffer[Bearbeiten | Quelltext bearbeiten]
The bootloader fills its page buffer, creates a crc16 checksum over the received data and sends it back to the master.
PAGE_COMMIT :: Write the page buffer[Bearbeiten | Quelltext bearbeiten]
This command lets the bootloader commit the current page buffer and writes it to the flash.
BOOT :: Boot the application[Bearbeiten | Quelltext bearbeiten]
Start the application & disable interrupts.
Error handling[Bearbeiten | Quelltext bearbeiten]
Errors are exclusively handled by the host software in order to keep the bootloader small and therefore compatible with a broad range of devies. In its current Version the bootloader utilizes 1.8 Kilobytes on an ATmega8.
Whenever the host software detects that there's been an error (i.e. a wrong crc16 checksum), it just sends the appropriate segment again. When all received checksums were found to be correct, it commits the page.
Security[Bearbeiten | Quelltext bearbeiten]
In its current version, data is sent unencrypted and unauthenticated. The mayor reason for this is, because all possible (secure) ciphers or hmac functions are too big (in terms of flash size) to fit into 2K of flash. This is the maximum size we allowed for this project in order to let it run on an ATmega8 and similar controllers.
If you want, you may however add encryption and/or authentication on your own (see AVR-Crypto-Lib). Mind that you probably need a device that supports bootloaders greater than 2K.
